Picture this, you’re suiting up for a special occasion, ready to make an impression that lasts. As you scan your wardrobe, you spot it – the bowtie. It’s not just an accessory; it’s your secret style weapon, and today, we’re going to unlock its full potential. Tying a bowtie may seem like a mysterious art, but fear not, because we’re here to demystify the dapper! So, grab your bowtie and get ready to tie your way to sartorial glory!
1: Begin with the bowtie around your neck. Start by placing the bowtie around your neck, with one end (the “active end”) hanging about two inches longer than the other end (the “passive end”). The active end should be on your right side, and the passive end on your left side.
2: Cross the active end over the passive end. Take the active end and cross it over the passive end, creating an “X” shape right below your chin.
3: Loop the active end behind the passive end.Wrap the active end around the passive end, going behind it. You’ll now have the active end on your left side, and it should hang down slightly.
4: Bring the active end back to the front. Pull the active end back to the front, crossing over the knot you’ve just created. This forms the front loop of the bowtie.
5: Create the bow shape. Hold the front loop (the part you just brought back to the front) between your thumb and forefinger to create the bow shape. Ensure it’s centred and symmetrical.
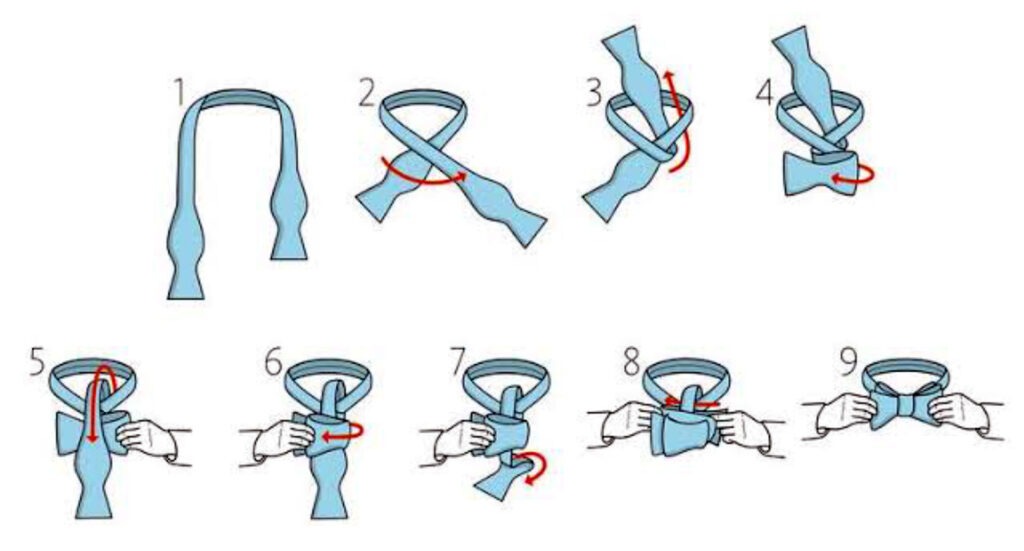
6: Fold the passive end over the front loop. Take the passive end and fold it horizontally over the centre of the front loop. It should cover the front loop, forming the other half of the bow.
7: Bring the active end back over the folded passive end. Now, take the active end (which is on your left) and bring it back over the folded passive end, creating a loop behind the folded part.
8: Insert the active end through the loop.Insert the active end through the loop created behind the folded passive end. This will form a knot at the centre of the bowtie.
9: Tighten and adjust.Gently pull both ends to tighten the knot. Ensure the bowtie looks symmetrical and adjust the size by pulling on the loops as needed. It should be snug but not too tight.
10: Final adjustments.Make any final adjustments to the shape and symmetry of the bowtie. Ensure that both ends are even and that the bowtie is centred on your neck.
Congratulations! You’ve successfully tied a bowtie. With practice, you’ll become more proficient at creating the perfect bow.